Sunday, September 22, 2013

-My Experience- Tiny Creatures and Close-Up Lenses

-My Experience-

Tiny Creatures and Close-Up Lenses


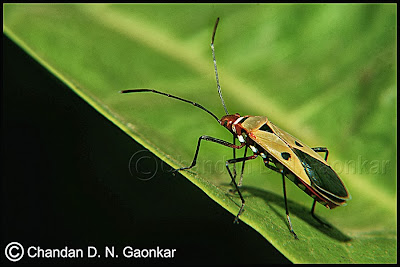
Mr. Chandan D. N. Gaonkar of Panaji (Goa-India) is an emerging photo artist. He has been a contributor for our blog since its inception. This time he is before us with his experience about clicking tiny creatures with close-up lenses. This technique is quite simple and has been very popular among the beginners.

--Dr. Pankaj Sharma

"Mother Nature has blessed the earth with innumerable living beings. Small creatures have their own world. Their shapes, vibrant colors, textures and activities are real pleasure for our eyes. It is always very delightful to see these little beings in their own world that is far from the crowd of human life. Whenever I shoot these creatures, my first intention is to respect Mother Nature. I never disturb my subjects, and give them proper respect. There are times when I have to keep waiting for them for their best moments. But this stay also gives me a deep satisfaction.
Photographing small creatures requires a special macro lens which is often very expensive. The close-up lenses of different powers are the good alternative to a macro lens. These lenses permit a normal or a zoom lens to focus at the small objects by going close to them, the same as a magnifying glass helps us observing the small subjects closely. These lenses can be screwed on the front of lens, and are easy to use. They are of different powers, like +1, +2 and +4. We have to choose the power of lens according to the size of the subject. If the subject is small, we need a high power lens (such as +4). On the other hand, if the subject is a bit big, use of a lens of +1 or +2 power is enough. If case, the subject is too much tiny, we can use the combination of two or more lenses (such as +4 and +1 or +4 and +2). But the grouping of two or more lenses can decrease the quality of picture.
Although the images with above lenses are not very much good in quality, yet we can get satisfactory results by keeping a few points in our mind:
* We should not use very high power of close up lens. Likewise the combination of two or more lenses should also be avoided.
* We have to click the images in proper light.
* The use of small-size aperture helps in getting the images with proper sharpness and depth.
* Resting the camera on a firm tripod is always recommended as this prevents shake while close-focusing.
* Use of fill in flash is very helpful in low light condition."

--Chandan D. N. Gaonkar


Sunday, September 8, 2013

Learning: Photographing Historical Sculptures

-Learning-
Photographing Historical Sculptures in Ambient Light

     Ancient sculptures are good source of knowledge of our glorious past. We observe such figures in old temples, museums and at other important places and often tend to photograph them for our record. We can photograph them in proper way by keeping a few points in our mind.  
                                                                              
Equipment/Accessories/Articles:

* D SLR Camera: Any D SLR Camera with necessary features.
* A normal lens (50 mm), any standard zoom lens (18-55 mm, 18-105 mm etc.) or a Macro Lens (100 mm) is ideal for our purpose. However a macro lens is very useful in close focusing of small figures and in getting fine details.
* A firm tripod to avoid camera shake in low light conditions.
* Polarizing filter to avoid glare of the figures with shiny surface.
* Backgrounds (Colourful papers or clothes).

Light: Light is the essence of a picture. Proper light helps in highlighting the details and in giving a feel of depth to a sculpture.  Mild sunlight of morning and evening is suitable for our work. Moreover we can get amazing results with the light coming through a window/door in a room. Use of one-sided light can be fruitful for photographing sculptures. We should place the sculpture in such a manner that light may fall on it either from left or from right side. But in such condition half portion of the object remains shady. This portion can be treated with the help of a reflector or a white card sheet by providing some reflected light (Nearly 50% of the highlighted portion or as required). If we notice some darkness on any other portion of sculpture, we can fill it with reflected soft light from required angle. If the background seems too dark and we need to highlight it, we can show it up by tilting it towards the source of light or by giving some light to it through another reflector. In this situation we can take help of any of our friends of colleagues.

Selection of Background: Selection of appropriate background doubles the beauty of a picture. So we have to be very cautious in regard of background. Background should be simple and sober. Texture of the background should not be glossy, as it will reflect unnecessary light towards the lens. Papers and cloths of different colours can be used as background. Colour of the background should match to the colour of sculpture. Nevertheless the black background suits almost every colour (except dark ones). So we can use a black background with the sculptures of different colours if we lack a variety of backgrounds.

Exposure: Suitable exposure (the light reaching to the subject through the combination of aperture and shutter speed) is a vital factor. For every part of the figure in focus and for good depth, we should always choose a small size of the aperture (like 22 or 16). The shutter speed of the camera can be selected accordingly. Use of aperture priority mode is also useful. In this mode we have to select the aperture and the shutter speed is determined by the camera. If we get a little bright or little dark image, we can manage the results by using exposure compensation mode by lightening or darkening our image slightly.
 
Composition: Perfect composition is an important element. We should always try to compose the photograph with simplicity. Some space should be left around the object, as it will give a sense of openness to the picture.  If we are on the profile (side view) of a sculpture, we should leave some space in front of the sculpture.

Important: Before photographing the sculptures of historical importance, we should always take permission of concerned authority.

(Images courtesy: Panchala Museum, MJP Rohilkhand University, Bareilly-U.P-India)

--Dr. Pankaj Sharma