From the Archive.....
-Learning-
Pictorial
Portraiture
By: K. G.
Maheshwari
Portraiture is not just recording
fleeting moments and instant snapshots – it is a pictorial biography of the
human face.
The aim of a photographer in a portrait is to envision, capture and communicate whatever beauty, strength and worthiness of character his or her subject possesses. The crucial factor in capturing the character of the subject is the rapport between the photographer and the subject.
A pictorial photographer does not aim and end only to idealize his subject as a professional portraitist would do, but attempts to create a character study – a physio-psycho analysis of the subject.
In pictorial portraiture, good technique is an absolute necessity; so also good composition, which is achieved through intelligent elimination.
A good portrait is the end result of careful observance, thought and planning to bring out the personality of the subject and the environment by imaginative interpretation, creative composition and effective use of lighting.
OUTDOOR:
Natural Light:
Nature has given us sun as the main source of light producing infinite effects - offers innumerable combinations of lighting - direct sunlight, sunlight with reflected light to fill the shadows or diffused sunlight with reflected light as a key source.
Direct sunlight is very harsh, but is capable of giving striking texture. The quality of sunlight is recognized by its shadow sharpness as also by the highlight acuteness. The direct concentrated rays of the sun1 produce small acute highlights, while sun covered by thin clouds2 or fog acts as broad light source producing broad highlights and soft shadows.
An overcast day3 is conducive in creating portraits of pensive or meditative mood. The handsomest light of all for well-modeled, soft-edged shadowy portraiture is semi-misty sunlight diffused through continuous haze or high clouds – at once brilliant and soft.

Morning and afternoon are the best
times. The sun, being lower in the sky must pierce thick layers of atmosphere.
So even on a clear day, the sun gives soft side lighting. Its angle reveals
form and features. This soft-textural light gives the face a delicate
roundness.
On clear days, brilliant sunlight can be softened when filtered through a net or a translucent plastic stretched on a large wooden frame4. This in combination with reflected fill-in light makes for ideal control of outdoor light. The best reflector of all is a broad, chalk-white board or some white fabric large enough to throw an enveloping light over the entire subject. When the sunlight is strong and a diffusing screen is not handy, it is possible to place the subject in shade and direct sunlight from a reflector as a dominant source.
On an overcast sky or in the shade on a bright day, flashlight can take over the role of main light source thus brightening up a flat-lit subject. When the sun is the main light source, flashlight can be a very good fill-in.
Under studio conditions, the key light positioning is usually adjusted to the most favorable presentation of the subject. But photography outdoors requires skillful adjustment of the subject to meet the demands of already established lighting conditions.
INDOOR:
(A) Available Light:
Window Light is both soft and moderately directional producing good modeling, in a room with a single window the lighting is so one sided that it creates deep shadows - a `fill-in' reflector5 or artificial light as `fill-in' becomes essential. The softness of light will also depend on the size of the window or its distance from the subject. It is better if the window is a large one than a small one. A north aspect is better than south and an east better than west. A workable arrangement in taking portraits by window light can be set up in a light coloured room that has windows at right angles6 fairly close to each other in its corner. The background can be a wall or a board painted off-white on one side and dark gray on the other. The light coming through the nearer window could act as main/key light and light from the other window plays the role of fill-in.

(B) Artificial Light:
Artificial
Light is under the photographer’s complete control. An important point to be
kept in mind while setting-up portrait lighting is that there should be one
dominant main modelling light source, all other lights being subordinate and
subservient to it. The positioning of the main (modelling) light7 source is the
most important factor within our control. The angle, the direction and the
distance at which the main light is positioned has a profound influence on the
modelling and the overall effect. If the main light is placed immediately in
front of the subject and as near as possible to the camera/subject axis, there
will be a minimum of modelling or plastic effect. A frontal light can very easily
produce flatness. If it is now raised to an angle of about 45o7 in relation to
the subject, it will give slightly better modelling, at least on a vertical
plane. Raising the light so that it is 45o to the subject both vertically and
horizontally8 is going to give the maximum plastic effect. While positioning
the main light, one should see that the catch lights in the eyes are preferably
appearing at either one o'clock or eleven o'clock position.
Reflected light9 has the softest and broadest quality of all and is obtained by turning the lights on to a matt white reflecting surface instead of directly on to the sitter. Its soft quality suits women and children admirably and it can be used for soft shadow less high-key effects.
While placing of the main light, observe the quality of light and modelling, is influenced by the light's distance from the subject. Watching from camera position, the formation of highlights on the forehead, bridge of nose, brows, upper parts of the cheeks and chin determine the distance of this light from the face. A movement of a few inches away from the subject has a considerable effect on the gradation of tones. A light too near burns out all the delicate half tones while too far away gives a flat weak look. For every face, there is a point, which gives the best result - sheen and texture of the skin.
If we have a strong, full of character, male subject, it is logical to have a strong modelling to emphasize his character and this demands low-key lighting and maximum modelling. Pictures full of shadow or darkness (low key pictures) have a greater tendency to create emotional effects than those lighting compositions, which consists predominantly of light and subtle middle tones (high key pictures). Low-key lighting is most effective with a dark background and a dark skinned model with rugged features.

On the other hand for a more
delicate or ethereal subject, we will find that less modelling and a more
high-key effect is desirable, particularly if the subject is blonde and wearing
light tone clothing. The lighting for child portraiture should be almost shadow
less - so that the child can move his head, body or hands without necessitating
any changes in the lighting. This lighting set-up permits the photographer to
concentrate, to react to the child's rapidly changing expressions and capture
them instantaneously. To maximize the effect of this lighting, the child's
dress and background should be of a very light tone/colour, even white.
As per general perception, highlights on forehead, nose, cheeks and chin seem to protrude these lighted areas of the face while the parts of the face and neck in the shadow to recede. This tends to create third dimensional telling effect. The best form rendering of a three dimensional object is achieved by a light which meets the line of camera vision at an angle between 45o and 90o.
The sole function of fill-in light is to illuminate the shadows; the fill-in light is diffused and placed closer to the camera at lens level and on the side of lens opposite that of the main light. The distance between the fill-in and the subject is adjusted to bring out the effect and contrast desired.
Contrast is difference in the amount of light of ‘main’ that falls on highlight of face and the amount of light (as enhanced by fill-in) falls on shadow side of face. Human eye can see a wide range of contrast, while film/digital sensors can cope up with and record comparatively limited range of contrast. Thus latitude of film/digital sensors dictates the photographer that while positioning the ‘main’ and ‘fill-in’ should not exceed range of contrast (Lighting Ratio), that can be recorded by film/digital sensors – expose to strike appropriate balance between highlights and shadows.
Light ratio is the difference between degrees of brightness of ‘main’ and ‘fill-in’ lights. If the ‘main’ light is twice as bright as the ‘fill-in’, the ratio is 2:1 – an exposure factor of 2 equal to one stop of exposure, i.e. increase exposure by one stop allowing in twice the amount of light. A 3:1 ratio would be a stop and half; 4:1 would be a two stops difference. To arrive at the ratio just multiply or divide by 2. To determine the exposure difference in a ratio of 5:1 divide it by 2. It is 2 ½ stops. A 2 ½ stops difference between the lights multiplied by 2 will be 5 – ratio of 5:1.
Definition of appropriate lighting ratio is very subjective. Following chart shows the most common lighting ratios with exposure differences and how those lighting ratios
are commonly used.

Bounce flash: The flash even if attached to the camera, is directed upwards to
a light coloured ceiling. This reflected light gives soft illumination over the
whole scene, eliminating any cast shadow on the background. The lighting is
quite soft and almost resembling natural lighting under an overcast sky -
eminently suitable for portraits. Bounce light does not fall off as rapidly as
direct flash.
The flash should not be bounced too steeply upwards producing a bright circle of light directly above the subject. This acts as a top lighting, casting shadows in eye sockets and tending to emphasize wrinkles and warts.
Background Light10: Background light's purpose is to help provide tonal separation between the subject and the background. The background light is placed between the subject and the background and its exact placement will depend on the effect desired. The light should be covered by the subject's body and in no case seen by the camera lens.
Hair Light11: Head is frequently highlighted by a light from behind or the side, never over the hair into a small hard patch.

Background:
(A) Natural Light:
While photographing against natural background, whether indoors, at home or outdoors, keep it as simple as possible.
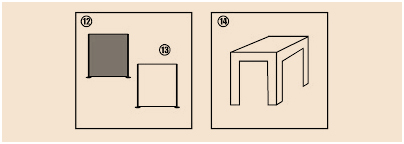
Alternatively, a medium or dark grey blanket12 stretched taut and free from creases can be used as a background and the desired tone can be achieved by regulating the direction of sunlight on the blanket.
(A) Natural Light:
While photographing against natural background, whether indoors, at home or outdoors, keep it as simple as possible.
Alternatively, a medium or dark grey blanket12 stretched taut and free from creases can be used as a background and the desired tone can be achieved by regulating the direction of sunlight on the blanket.
Background:
(B) Indoor Available/Artificial:
It is advisable to use a plain background - a white or off white wall or a board13 7 ft. x 5 or 6 ft. painted matt so that it does not create glare or highlights. Tone variations can be introduced by background light.
Middle and light tone backgrounds seem more effective with a variation in their tones. Dark backgrounds produce a somber pensive mysterious feeling while light ones create a happy ethereal dreamy mood.
Props/Posing
The posing seat 14 can be - approximately 20 inches high.
Nearly everybody (except the very young) is self- conscious in front of the camera. One of the photographer's main tasks is to make the subject feel at ease and create a rapport, which results in the kind of expression one wishes to capture. Asking the subject to moisten the lips will help not only to relax the muscles of the mouth but will also add lustre to the lips.
Nothing looks more boring than the straightforward view. The first step, therefore, is placing the posing seat at an angle before the subject arrives. Seat the subject and get him or her to turn the head towards the camera but not full face. The body leaning a little forward from the waist towards the camera will make the pose more active and will give a feeling of alertness. The picture appears much more free, easy and livelier if the head is turned slightly to the left or right. For mood depicting picture, it is usually advisable to have face and eyes pointing away from the lens.
The two features, which outwardly
seem to control expression, are the eyes and the mouth. The eyes mirror the
subject’s character – inner personality. Usually, it is better to have eyes
looking in the direction towards which the head is turned, with only the
slightest departure from a normal level gaze. Otherwise it will give a faraway
look and lose brilliance. The eye near to the camera should always be in focus.
The eye sockets should be well illuminated and there should be catch-lights in
the eyes. To break up a stare or screwed up expression, ask the subject to
close the eyes for a few seconds and then open.
The mouth is a very mobile expressive feature capable of conveying the whole range of feelings. Hands can be as expressive and communicative as the face and can form an interesting and revealing part of a picture. The hands play a crucial role by their position in relation to the head to give balance to the composition. Let the subject hold something suitable – handbag, fan, spectacles, book, etc.
A good child-picture is seldom posed. The un-self-conscious and unprompted child gives infinite variety of poses exhibiting expressions of wonder, liveliness, surprise, innocence, etc. Success with children hinges on tactful and sympathetic interaction to their ever fleeting moods and fancies. Too much of direction can over-awe a carefree child to be self-conscious, afraid and un-cooperative.
Every human face has certain peculiarities of feature. However, while making a pictorial portrait, one can make use of these. Even very ordinary features have some angles that are more pleasing than others – emphasize them. To make the best of what is in front of the camera, slight adjustment of head and camera has its effect on the features. A long nose looks longer if the head is tilted down; a short nose looks shorter if the head is raised. A broad nose looks broader if taken full front to the camera with shadow-less lighting. Turning it sideways and putting part of it in shadow seemingly reduces its width. Avoid having the tip of the nose coincide with the contour of the cheek or project only slightly beyond it.
For head-and-shoulders portrait keep optical axis of the lens at the height of the subject’s lips and tip of the nose. By placing a camera slightly lower the level of eyes of the subject apparently adds to his height and dignity. Raise the camera above the center of the face to help elongate the nose, narrow the chin, reduce fullness of the jaws, or broaden the forehead. Lower the camera if it is advisable to shorten the nose, reduce the width and height of the forehead, or accentuate the chin and neck. Long neck requires a high viewpoint to make it appear shorter. Hair will make the face appear longer if curved over cheeks or combed off forehead.
The photographer studies closely the features of face of the subject, to make a “living” portrait by not only idealizing but, if need be, by emphasizing the facial oddities. To create ‘character study’ the pictorial photographer attempts to depict subject’s characteristic likeness by judiciously combining: (a) proper posing, (b) effective lighting and (c) instinctively positioning of camera appropriately.
Finally, a good portrait is that which captures some individualism in the subject. It is a consciously created image of the subject. The personality of the sitter, the environment, the composition, and the choice and quality of lighting all contribute to the final result.
Portraiture: Helpful Tips on Corrective Steps
The primary goal in portrait photography is to possibly present the subject in a favorable manner. It is rare to find in an individual some one or more aspects, which will not provide an agreeable and interesting portrait. Watch for and find by turning him from full face to profile and capture it.
The problem is combining the pose, lighting, and camera viewpoint to show the subject to best advantage. Because the photogenic qualities of each person's face vary, certain corrective techniques in posing, lighting, and camera heights can be used to improve the quality of the portrait. Changing the camera viewpoint, combined with proper lighting and pose, can create amazing alteration in the pictured appearance of any face.
The following corrective techniques can be used to correct common problems. A challenge to the portraitist occurs when the subject's facial structure requires employing more than one of these corrective measures and procedures at the same time. The best remedy may often be to use only the most effective of the two. While making a ‘pictorial’ portrait one may wish to make use of one or more of these irregularities.
Corrective Treatments
Full Face
Face
has a more rounded appearance when head is raised
Face has lengthening appearance when it is lowered
Face has lengthening appearance when it is lowered
Double Chins and Heavy/Round Face
Ask
the sitter to lean and stretch forward as if to touch the camera with the tip
of their nose.
Avoid low camera angles.
Shoot three-quarter view, light side of face away from camera. Use three-quarter or side lighting
Thin Face
Avoid low camera angles.
Shoot three-quarter view, light side of face away from camera. Use three-quarter or side lighting
Thin Face
Shoot
front, full face. Use low three-quarter or side lighting
To make Face appear wider
To make Face appear wider
Cover
the neck with hair
Ears exposed
Hair low on forehead
To make Face appear longer
Ears exposed
Hair low on forehead
To make Face appear longer
Hair curved over cheeks
Hair combed off forehead
Square Face
Hair combed off forehead
Square Face
Use
high-camera viewpoint
Oval Face with a weak Chin
Oval Face with a weak Chin
Use
low-camera viewpoint
Wide Forehead
Wide Forehead
Use
low-camera viewpoint. Tilt chin upward
Narrow Forehead
Narrow Forehead
Use
high-camera viewpoint
Baldness
Baldness
Use
low-camera viewpoint. Little or no hair light, blend head with background
Prominent Ears
Prominent Ears
Use
short lighting in a 2/3rd view of the face.
Turn the head until the far ear is totally hidden.
Small Ears
Turn the head until the far ear is totally hidden.
Small Ears
Turn
head so camera sees only one ear. Place exposed ear in shadow
Large Ears
Large Ears
Turn
head so camera sees only one ear. Place exposed ear in shadow
Protruding Ears
Protruding Ears
Turn
head so camera sees only one ear. Place exposed ear in shadow
Shield light from exposed ear. Blend ear into background
High Cheeks
Shield light from exposed ear. Blend ear into background
High Cheeks
Use
low front or side lighting
Wide Cheeks
Wide Cheeks
Shoot
three-quarter pose
Prominent Nose
Prominent Nose
Shoot
straight into the tip of the nose.
Raise the face as needed.
Avoid high camera angles.
Use low-camera viewpoint. Use three-quarter or side lighting. Apply dark makeup to tip of nose
Avoid high camera angles.
Use low-camera viewpoint. Use three-quarter or side lighting. Apply dark makeup to tip of nose
Long Nose
Use
low-camera viewpoint. Use three-quarter or side lighting. Apply dark makeup to
tip of nose
Short Nose
Use
high-camera viewpoint. Use front lighting
Hooked Nose
Hooked Nose
Shoot
from a low-camera viewpoint. Shoot front, full face
Crooked Nose
Crooked Nose
Shoot from the side to which it curves. Turn head until highlight along ridge
of nose appears straight
Broad Nose
Broad Nose
Pose
head away from a front view
Uneven Mouth
Uneven Mouth
Pose
head in three-quarter view
Narrow Mouth
Narrow Mouth
Use lip color to extend lip line
Turn head to one side so makeup is not apparent. Position modeling light high to cast shadows at ends of lips
Wide Mouth
Turn head to one side so makeup is not apparent. Position modeling light high to cast shadows at ends of lips
Wide Mouth
Pose
head in three-quarter view
Protruding Lips
Protruding Lips
Use
low-modeling light to eliminate shadow under lips
Thin Lips
Thin Lips
Fill
out with lip color
Poor or Crooked Teeth
Poor or Crooked Teeth
Avoid
cross lighting.
Include poses with a pensive, closed mouth expression.
Reassess the teeth under various lighting angles, looking for protrusive and uneven teeth.
Include poses with a pensive, closed mouth expression.
Reassess the teeth under various lighting angles, looking for protrusive and uneven teeth.
Bad Teeth
Do
not have subject smile
Buck Teeth
Buck Teeth
Subject
may smile slightly. Use full, front pose
Prominent/Square/Long Chin
Prominent/Square/Long Chin
Use
high-camera viewpoint
Double Chin
Double Chin
Keep
chin in shadow. Have subject lean forward and look at camera
Small Chin
Small Chin
Use
full, front pose. Use low-camera viewpoint
Short neck
Short neck
Use
low-camera viewpoint
Long neck
Long neck
Use
high-camera viewpoint. Keep neck in shadow
Uncontrolled Blinking
Uncontrolled Blinking
Caused
primarily by the "flinch" after hearing the noise of the camera prior
to the exposure. Try using the mirror lockup setting.
Lazy or Weak Eye
Lazy or Weak Eye
Ask the subject to look at an object located in a distant corner of the camera
room can often solve the problem.
Deep Set Eyes
Deep Set Eyes
Try
lowering the key light.
Looking up slightly
Avoid high ratio lighting.
Small Eyes
Looking up slightly
Avoid high ratio lighting.
Small Eyes
Shoot
three-quarter pose. Use three-quarter lighting so the eyes are in shadow
Large or protruding Eyes
Large or protruding Eyes
Use high three-quarter lighting. Lower eyes slightly
Deep set Eyes
Deep set Eyes
Low-camera viewpoint. Use front lighting to keep eyes out of shadow
Uneven Eyes
Uneven Eyes
Turn
head toward one side so natural perspective eliminates uneven appearance
Bags under Eyes
Bags under Eyes
Use
makeup. Use front lighting
Cross Eyed or defective Eye
Cross Eyed or defective Eye
Turn
head so bad eye is away from camera.
Light side of face toward camera to place other eye in shadow
Light side of face toward camera to place other eye in shadow
Glasses and Eye-wear
Raise
the key light much higher
Use high front, three-quarter, or side lighting to eliminate reflections
Raise the temple piece up slightly to angle lenses down tilt head downward
Tilt the glasses and raise the earpieces slightly above ears (the ear pieces can be hidden into the long hair of the subject).
Shoot full-face pose to prevent lenses from splitting cheek line. Use indirect diffused lighting.
Removal of lenses from the frames may also be helpful.
Facial blemishes
Keep
in shadow
Turn bad side of face from camera. Apply makeup to a pimple or sore spot.
Turn bad side of face from camera. Apply makeup to a pimple or sore spot.
-- K. G. Maheshwari


.jpg)